For example, the default color to remove is white (which is what we want to use too). However, be aware that shades of gray will turn semi-transparent with this method. The lighter the color the more transparent it will be, the darker the color the more opaque it will remain. So black remains black, white becomes completely transparent, and shades of gray have varying degrees of transparency. If you try this method on an image with colors, you will find that light colors (such as pink) become semi-transparent as well.
Version One
Step 1: Click "Colors" and then on "Color to Alpha."
Step 2: A pop up window should open up. The default color choice is white, so just click on "OK."
And you are done. Save the image as a .png file (that will enable the image to have transparent parts).
However, you will notice that everything that is white turned transparent. What if you only wanted the background to be transparent but wanted the object/design itslef to remain white?
Doing that will involve more steps. Start with an image that still has the white background
Version Two
Step 1: You'll need to select the "Fuzzy Select Tool" (it looks sort of like a magic wand with a yellow tip). Once it is selected click on all of the areas of the image that you want to be transparent. You can make so more than one area is selected by holding the "shift" key down as you click on each area of the drawing. You should see an animated dashed line appear around your selections (this is often referred to as "marching ants" as it kind of looks like a line of...well, marching ants).
Pay attention to any "open" spaces that makes so it selects parts inside of the design that you do not want selected.
If that happens I like to duplicate the design.
And then on that new layer, in red (so I can see where I've drawn), I will fill in the space. So when I use the Fuzzy Select tool again it won't select inside the design anymore. When I've used the Fuzzy Select Tool on that layer I then hide that layer by clicking on the "eye" next to it in the layers dialogue box. I then make sure that the layer I want to work on is selected.
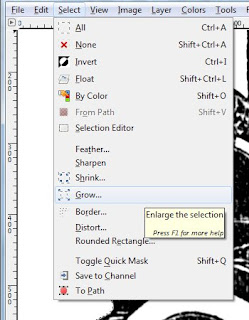
Step 2: Next, click on "Select." Then choose "Grow." A dialogue box will pop up asking how much you want to grow the selection by. I usually choose something between 2 and 4.
What you want is so the dashed lines are somewhere in the middle of the lines of the drawing.
If you don't do this you will end up with a "white glow" around your image when you apply the Alpha Transparency. So you want to do this so it then instead takes those pixels of white and gray right on the edge and makes them transparent and semi-transparent, so they blend nicely with whatever color background you then put the image on.
Step 3: Repeat the steps in the Version One part of this tutorial (Click "Colors" and then on "Color to Alpha." etc...)
You can press Shift+Ctrl+A to remove the marching ants selection. Your image is now ready to save as a .png file.
Note: All images up above are copyright of this blog. However...the vintage image of the car below is in the public domain. But if you would like a copy of the vintage car used in this tutorial for your own use click here.


No comments:
Post a Comment